Textmagic and Shopify Integration
- Overview
- What the integration does
- Two ways to use Shopify automations
- Choosing how notifications are delivered
- Before you start
- How to set up the Shopify integration
- Managing your integration
- Using the Shopify integration with Textmagic Automations
- How other Shopify businesses use Textmagic
- Common use cases
- Frequently asked questions
Overview
Textmagic connects directly with Shopify, letting you sync your store’s customers and automate SMS and email messages based on orders and customer activity, with no third-party tools required.
Once connected, your Shopify customers are imported into Textmagic as contacts, mapped to the fields you choose, and added to a list you can message straight away.
What the integration does
With the Shopify integration, you can:
Import your existing Shopify customers into Textmagic as contacts
Automatically sync new customers as they sign up or place orders
Map Shopify customer data to Textmagic contact fields, including marketing consent fields
Add imported customers to a specific contact list
Trigger automated SMS and email workflows based on Shopify order events
Use Shopify events inside automation flows as wait conditions, not only as starting triggers
Two ways to use Shopify automations
There are two distinct ways customers typically use Textmagic automations together with Shopify, and it’s helpful to know which one fits the message you want to send.
- Transactional flows (the order lifecycle). These flows inform the customer about something that has just happened in their order. They start when a specific Shopify event fires (Order created, Order paid, Order shipped, Order fulfilled, or Abandoned checkout), and they keep the customer informed at every stage of the ordering flow. Typical examples are order confirmations, payment receipts, shipping updates with tracking links, and cart-recovery reminders.
- Marketing and lifecycle flows. These flows are designed to grow revenue or relationships rather than confirm a transaction. Common examples are upsell sequences (recommending a complementary product after a purchase), winback campaigns (re-engaging customers who haven’t ordered in a while), churn-prevention messages, and welcome series for newly synced contacts. They often combine a Shopify trigger with rules, time delays, and conditional splits to deliver the right message at the right moment.
Important: Marketing flows must only target customers who have consented to receive marketing messages on the channel you’re using. See Using marketing consent fields below.
Choosing how notifications are delivered
Shopify sends its own built-in notifications. Before you start sending the same kind of message from Textmagic, decide where each notification should come from. This avoids customers receiving the same update twice.
Email notifications in Shopify cannot be fully disabled. Shopify will continue to send order confirmations and shipping notifications by email regardless of your Textmagic setup. If you also want to send an email from Textmagic, design your content so the two messages don’t duplicate one another. For example, send a richer follow-up or review request from Textmagic rather than another order summary.
SMS notifications in Shopify can be disabled. You can turn off Shopify’s built-in SMS notifications and let Textmagic handle every text message instead. This gives you a single, branded SMS channel and full control over copy, timing, and follow-ups.
You can connect Textmagic to Shopify in two ways:
As the Textmagic app inside Shopify: install Textmagic from the Shopify App Store. This is the simplest setup and keeps everything inside the Shopify admin.
Through the Textmagic web app with API integration: use the integration setup described in this article. This is the right choice if you mainly work in Textmagic and want full access to automations, contact lists, segments, and other Textmagic features.
Before you start
Before setting up the integration, make sure you have:
An active Textmagic account
A Shopify store with admin access
Depending on how you plan to message your customers:
For SMS – a verified Textmagic number or Sender ID for your country. Learn more about SMS numbers: https://support.textmagic.com/article/textmagic-dedicated-virtual-numbers/
For email – a verified sending domain configured in your Textmagic account. Learn more about email sending: https://support.textmagic.com/article/connect-your-email-domain/
For a primer on collecting SMS consent at checkout and registering a sending number in your market (US, CA, UK, AU, or Europe), see How to text your Shopify customers (and stay compliant).
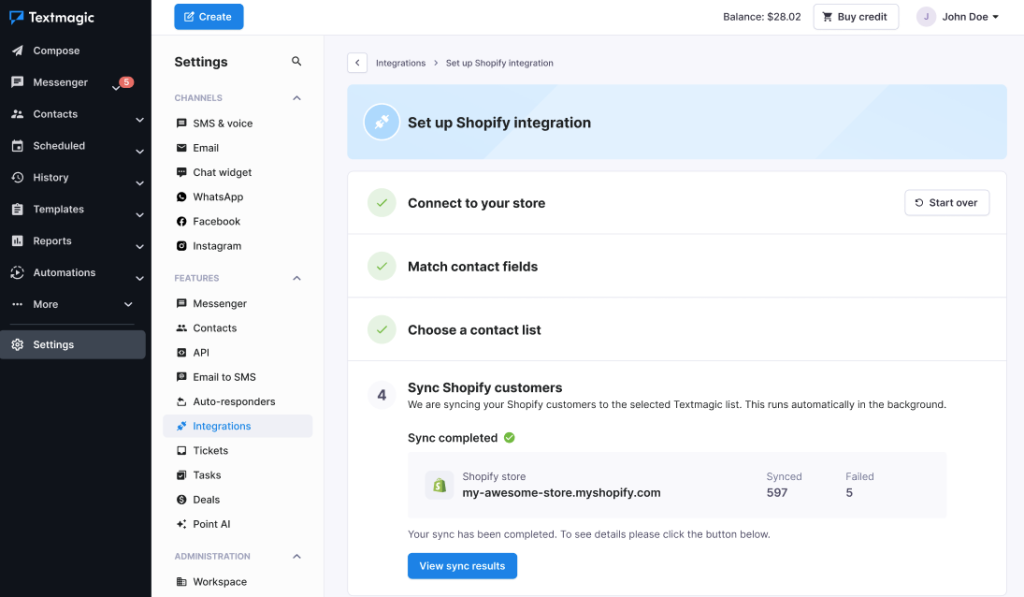
How to set up the Shopify integration
Go to Settings → Integrations → Shopify in your Textmagic account to get started. The setup wizard walks you through four steps in order.
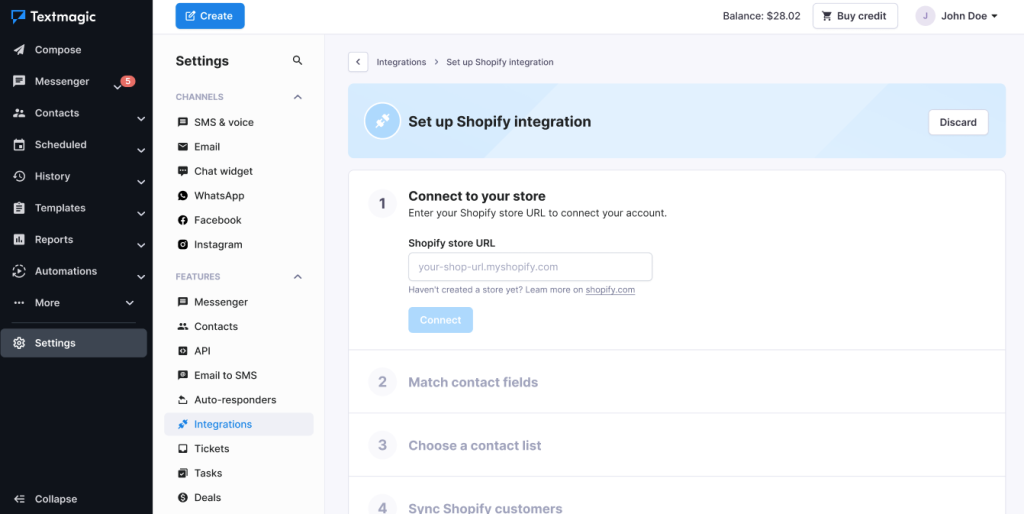
Step 1: Connect to your store
Enter your Shopify store URL in the format your-shop-url.myshopify.com and click Connect. Textmagic will verify the connection and confirm your store is linked.
If you haven’t created a Shopify store yet, you’ll find a link to https://shopify.com directly on this screen.
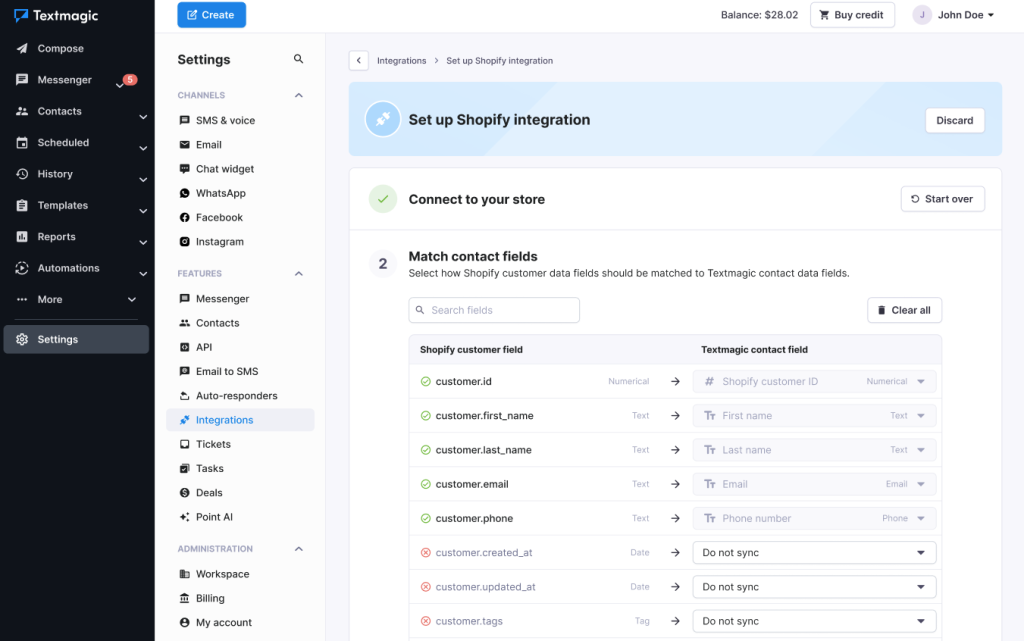
Step 2: Match contact fields
Once your store is connected, you’ll map your Shopify customer data fields to the corresponding Textmagic contact fields.
The following fields are mapped by default:
| Shopify customer field | Textmagic contact field |
|---|---|
| customer.id | Shopify customer ID |
| customer.first_name | First name |
| customer.last_name | Last name |
| customer.email | |
| customer.phone | Phone number |
| customer.tags | Tags |
| default_address.company | Company |
All other Shopify fields, such as customer.created_at, customer.state, address fields, and more, are set to Do not sync by default. You can map any of these to existing Textmagic contact fields, or create a new custom field on the spot.
Using marketing consent fields
If you plan to use Textmagic for marketing campaigns (newsletters, promotions, upsell, winback, and so on), you must map the Shopify marketing consent fields and use them to filter your audience. Shopify exposes two relevant fields:
customer.email_marketing_consent: whether the customer has agreed to receive marketing emails
customer.sms_marketing_consent: whether the customer has agreed to receive marketing SMS
Both fields are available in Step 2 of the setup wizard. We recommend mapping each one to a dedicated Textmagic contact field (the wizard suggests Accepts Email Marketing and Accepts SMS Marketing) so you can filter on them later when building campaigns or automations.
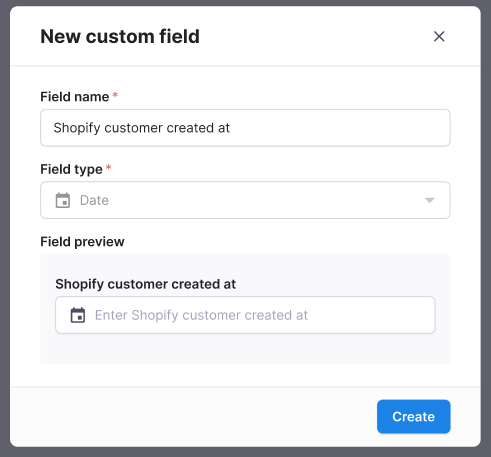
Creating a custom field
To create a custom field, click the dropdown next to the Shopify field you’d like to map, select Create new field, give it a name, and choose a field type (such as Date or Text). If the Shopify field type isn’t available in Textmagic, you can map it to the Text type instead. Click Create when you’re done.
When you’re happy with your field mapping, click Continue.
When you’re happy with your field mapping, click Continue.
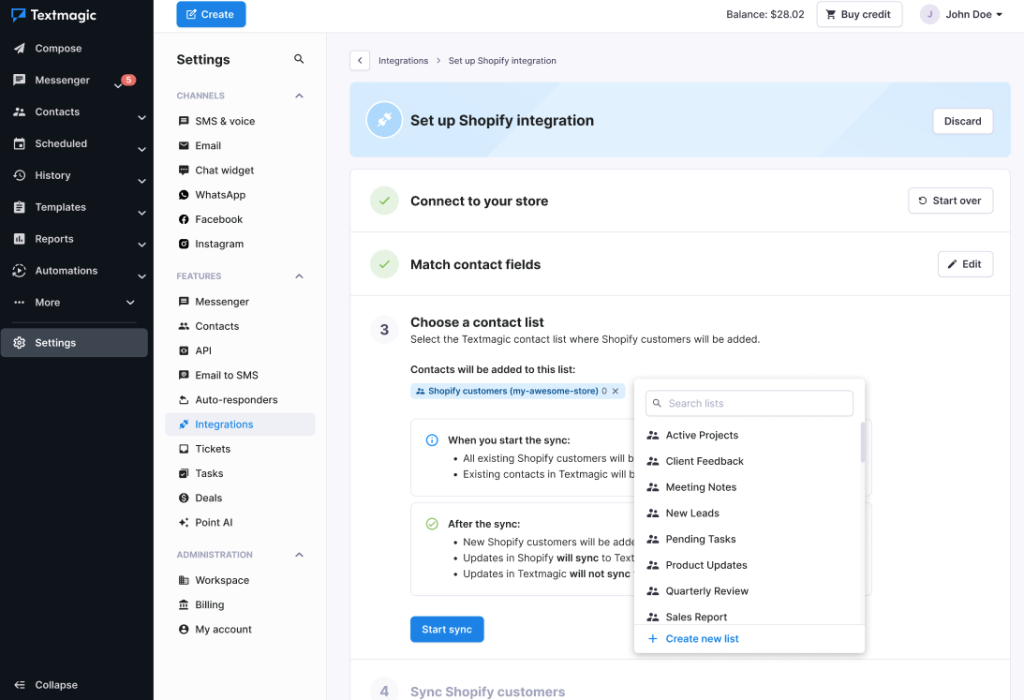
Step 3: Choose a contact list
Select the Textmagic contact list where you will add your Shopify customers. You can choose an existing list or select a different one using the dropdown.
Before you start the sync, it’s worth knowing how the integration works:
When you start the sync:
All existing Shopify customers will be added to the selected Textmagic list.
Existing contacts in Textmagic will be updated with the latest data from Shopify.
After the sync:
New Shopify customers will be added to Textmagic automatically.
Updates in Shopify will sync to Textmagic.
Updates you make in Textmagic to contact fields will not be pushed back to Shopify. The contact sync runs in one direction only: Shopify into Textmagic.
The integration writes to your Shopify store only in five specific cases:
Sync to Shopify, a manual option in the Textmagic contact view that creates a new customer record in your Shopify store from the selected contact. If the contact already exists in Shopify (matched by email or phone), the system recognises this and does not create a duplicate.
Add customer tag, Add customer note, Add order tag, and Add order note, the four Shopify actions available inside automation flows. See Shopify actions in Automations.
Once you’ve selected your list, click Start sync.
Step 4: Sync Shopify customers
Textmagic will begin importing your customers in the background. You’ll see a progress bar and a count of customers being synced. You can safely leave this page, the sync will continue running automatically.
Once it’s complete, click View synced contacts to see your imported contacts in Textmagic.
Managing your integration
After setup, you can return to Settings → Integrations → Shopify at any time to:
Edit your contact field mapping
Change the contact list customers are added to
Start over and reconnect your store using Start over
Completed steps are shown with a green tick. You can reopen any finished step using the Edit button next to it.
Using the Shopify integration with Textmagic Automations
Once your store is connected, the fastest way to get started is with one of our ready-made Shopify automation templates. In the Automation Templates gallery, you’ll find pre-configured flows for common ecommerce scenarios, including order confirmations, payment confirmations, shipping notifications, abandoned checkout follow-ups, review requests, and complete order lifecycle tracking. Each template comes with the appropriate Shopify trigger, recommended timing, and sample messaging already configured. Simply select a template, customize the message content, sender, and any filters you need, then activate the flow. Browse the available templates in the Automation Templates gallery and choose the Shopify category to see all Shopify-specific options.
For a step-by-step walkthrough of building order confirmation, shipping update, and delivery follow-up flows — including message examples and scheduling tips — see How to automate SMS order notifications for your Shopify store.
Goal: Send an SMS when a customer places an order, then follow up two days later asking for a review.
The order confirmation in step 4 is transactional and can go to every customer who places an order. The follow-up review request in step 7, however, is a marketing message and must only be sent to contacts who agreed to receive marketing SMS. To handle that, we add a Conditional split step before the follow-up that checks the Accepts SMS Marketing field you mapped during integration setup.
Go to Automations and click Create automation or choose an existing template.
Select a trigger. Choose Order created from the Shopify section.
Configure the trigger: select your store, leave category and product as Any, and set order value to Any value. Click Save.
Click Add next step and select Send SMS. Write your order confirmation message, for example: “Hi [first name], thanks for your order! We’ll let you know as soon as it ships. – [Your store name]”
Click Add next step again and select Time delay from the Rules section. Set it to 2 days.
Click Add next step and select Conditional split from the Rules section. Set the filter based on contact field “Accepts SMS Marketing”: Yes and click Apply. Contacts who match the filter follow the Yes branch; everyone else follows the No branch and exits the flow.
On the Yes branch, click Add next step and select Send SMS. Write the follow-up message: “Hi [first name], we hope your order arrived safely! We’d love to hear what you think. [review link]”
Leave the No branch as Contact exits, so contacts without marketing consent don’t receive the review request.
Run a test order on your store to confirm the flow fires once and that no duplicate messages arrive from Shopify’s built-in notifications. If a duplicate appears, disable the corresponding notification in Shopify.
Click Activate to turn the flow on.
That’s it. Every new order will now trigger the order confirmation, and only contacts who opted in to marketing SMS will receive the review follow-up two days later.
Note: You can apply the same pattern to any marketing-style step inside a Shopify flow. Drop a Conditional split before the marketing message, filter on Accepts SMS Marketing (or Accepts Email Marketing for email steps), and let the No branch exit. This keeps the transactional part of the flow reaching every customer while keeping the marketing part compliant.
Using Shopify triggers in Automations
Once your store is connected, Shopify events become available as triggers in Textmagic Automations. This lets you send automated SMS messages or emails (or perform other actions) when something happens in your store.
To use a Shopify trigger, go to Automations, create a new automation, and select a trigger from the Shopify section:
Order created: triggered when a new order is placed
Order paid: triggered when a payment is successfully completed
Order fulfilled: triggered when an order is marked as fulfilled
Order shipped: triggered when an order is shipped
Abandoned checkout: triggered when a customer starts but doesn’t complete checkout
Each trigger can be filtered by store, product category, specific products, order value, and additional contact data fields. This lets you target the right customers. For example, you can send a message only when a high-value order is placed, or only for a specific product category.
When composing a Send SMS or Send email action inside a flow, you can use Shopify customer fields as dynamic fields in your message. For example, you can personalise a message with the customer’s first name, order details, or any other field you’ve mapped during setup.
Using Shopify events as wait conditions in Rules
The Rules tab of the step picker holds the logic and timing building blocks of any automation flow. You combine these with Send SMS, Send email, and the other actions to control when and to whom each message goes out. The Rules tab contains:
Time delay: pause the flow for a fixed amount of time.
Conditional split: branch contacts based on a filter on contact fields (for example, marketing consent or tag).
Percentage split: send portions of contacts down different branches, useful for A/B testing message variants.
Wait until event happens: pause the flow until a specific event occurs within a defined window.
Reply-based split: branch contacts based on whether they replied to a previous message.
When your Shopify store is connected, Shopify events become available specifically inside the Wait until event happens rule, where they act as wait conditions. The flow pauses at that step and only continues based on whether the chosen event takes place within the window you define.
To set this up, add a Wait until event happens step to your flow and pick an event from the Shopify category in the event list. The Shopify category contains the same events you can use as triggers: Abandoned checkout, Order paid, Order created, Order shipped, and Order fulfilled.
Set a wait time (for example, 24 hours). Contacts for whom the event happens within that window go down the Yes branch; everyone else goes down the No branch.
This unlocks scenarios such as:
Order paid → wait up to 3 days for Order shipped. If shipped, send a tracking message; if not, send a “we’re getting your order ready” reassurance.
Abandoned checkout → wait 1 hour for Order paid. If paid, exit the flow silently; if not, send the recovery SMS.
Order fulfilled → wait 7 days for another Order created. If a repeat purchase happens, send a thank-you; if not, send a winback offer.
A connected Shopify store is required to use these events. If your store isn’t connected yet, the Shopify events will be greyed out with a prompt to Connect your store.
In practice, most Shopify flows mix several Rules together. You might pair Wait until event happens with a Conditional split that checks marketing consent before sending a follow-up, or with a Time delay that holds a contact for a few hours before the next message, or with a Percentage split that A/B tests two recovery messages on Abandoned checkout.
Shopify actions in Automations
Inside any automation flow you can combine Shopify-specific actions with the standard Textmagic actions to build richer sequences. From the Actions tab of the step picker, you have access to:
Messages: Send SMS, Send email
Contacts: Update contact, Add tag, Remove tag, Add to list, Remove from list, Unsubscribe contact
Tasks and deals: Create new task, Create new deal
In addition to these standard actions, once your Shopify store is connected the following Shopify-specific actions become available in the Shopify section of the action panel:
Add customer tag: adds a tag to the customer’s Shopify profile
Add customer note: adds a note to the customer record in Shopify
Add order tag: adds a tag to the related order
Add order note: adds a note to the related order
Combining the two sets is where the integration becomes powerful. For example, when a high-value Order paid fires you might: Send SMS thank-you to the customer, Add tag “VIP” to the contact in Textmagic, Add customer tag “VIP” in Shopify so your store team sees it too, and Create new task for someone on your team to include a handwritten note in the shipment. All four steps run automatically inside the same flow, with no copy-paste between systems.
How other Shopify businesses use Textmagic
These scenarios are based on common patterns among small and mid-sized e-commerce businesses using SMS and email automation. For detailed case studies from real Textmagic customers, visit https://www.textmagic.com/customers .
Fashion retailer, reducing abandoned checkouts. A clothing store set up an Abandoned checkout trigger in Textmagic. When a customer leaves without completing their purchase, they receive a friendly SMS within 30 minutes: “Still thinking it over? Your cart is saved, complete your order here: [link]”. A follow-up is sent 24 hours later with a small discount code. SMS open rates average around 98%, making it one of the most effective channels for abandoned cart recovery.
Home goods store, keeping customers informed. A home goods retailer connected their Shopify store to automate their entire post-purchase journey. When an Order paid trigger fires, the customer gets a payment confirmation SMS. When Order fulfilled fires, they get a shipping notification with a tracking link. The whole sequence runs without any manual input from the team.
Subscription box business, rewarding high-value customers. A subscription box company used the Order paid trigger filtered by Order value greater than $150. When a high-value order comes in, the automation sends a personalised thank-you SMS and creates a task in Textmagic for their team to add a handwritten note to the shipment.
Local food & beverage brand, growing their SMS list. A small food brand used the Contact added to a list trigger alongside their Shopify sync. When a new customer is synced and added to their Shopify customers list, they automatically receive a welcome SMS with a first-order discount, turning their customer sync into an active acquisition channel.
Common use cases
Order confirmations: Send an SMS or email as soon as a customer places an order.
Payment confirmations: Notify customers when their payment has been successfully processed.
Shipping updates: Let customers know when their order is on its way.
Abandoned checkout recovery: Reach out to customers who started checkout but didn’t complete their purchase.
Welcome messages: Send a personalised welcome SMS or email to new customers as soon as they’re synced to Textmagic.
High-value order alerts: Use order value filters in Automations to send a special message or create a task when a large order comes in.
Upsell and cross-sell: After Order fulfilled, wait a few days and recommend a complementary product to consenting marketing contacts.
Winback campaigns: Identify contacts who haven’t placed an order in 60+ days and send a re-engagement offer.
Frequently asked questions
What happens if a customer already exists in Textmagic when I run the sync?
If a contact with the same phone number or email already exists in Textmagic, their record will be updated with the latest data from Shopify. No duplicate contacts are created. Any data you’ve added manually in Textmagic will not be overwritten by the sync, but fields that are mapped will be updated with the Shopify values.
What happens if the sync fails for some contacts?
After the sync completes, you’ll see a summary showing how many contacts were synced successfully and how many failed. You can click View sync results to see details. Failed contacts are typically caused by missing or invalid phone numbers or emails. You can correct the data in Shopify and re-run the sync.
What happens if I disconnect my Shopify store?
If you disconnect your store, existing contacts and contact lists in Textmagic are not affected, they remain in your account. Automations that use Shopify triggers will stop firing until you reconnect a store. You can reconnect at any time from Settings → Integrations → Shopify.
How am I charged for messages sent through Shopify automations?
Messages sent via Shopify automations are charged to your Textmagic account balance, just like any other message you send. Each SMS is charged per message part, and rates vary by destination country. Textmagic uses 100% prepaid billing, charges are deducted from your account balance as messages go out, so there are no surprise invoices. For full pricing details, including per-country SMS rates and plan options, see Textmagic billing plans.
Can I use automations on any plan?
Automations, including Shopify triggers and actions, are available on all Textmagic plans. Your plan affects the volume discounts available on messages, not access to the feature itself. See Textmagic billing plans to compare your options.
Do the updates I make in Textmagic sync back to Shopify?
No, the contact field sync is one-directional: Shopify data flows into Textmagic, but edits you make to contact records in Textmagic (such as changing a first name, phone number, or custom field value) are not pushed back to your Shopify store.
The integration writes to Shopify in only five specific cases:
Sync to Shopify. From the Textmagic contact view, you can manually use the Sync to Shopify option to create a new customer record in your Shopify store from the selected contact. If a Shopify customer with the same email or phone already exists, the system recognises this and does not create a duplicate.
Add customer tag: an automation action that adds a tag to a customer’s Shopify profile.
Add customer note: an automation action that adds a note to a customer record in Shopify.
Add order tag: an automation action that adds a tag to the related order.
Add order note: an automation action that adds a note to the related order.
Cases 2 to 5 only run when an automation flow reaches that step. Outside these five cases, all changes you make in Textmagic stay in Textmagic. See Shopify actions in Automations for details on the automation actions.
How do I avoid sending the same message from both Shopify and Textmagic?
In your Shopify admin, you can turn off Shopify’s built-in SMS notifications so that Textmagic becomes the single source for SMS. Email notifications in Shopify can’t be fully disabled, so we recommend designing your Textmagic email content so it doesn’t duplicate Shopify’s transactional emails. Please always run a test order before you activate an automation to confirm that only one message goes out per event.