
Textmagic and HubSpot integration guide
Who this is for: anyone running HubSpot who wants their texts, contacts and CRM records to actually talk to each other, without exporting spreadsheets or copying phone numbers by hand.
What you’ll need: a Textmagic account, a HubSpot account you’re an admin on (or at least have permission to authorize an integration), and about five minutes.
Contents
What the integration does
This integration connects your HubSpot contacts to Textmagic. Once it’s set up, your HubSpot contacts sync into Textmagic, every text you send or receive shows up on that contact’s HubSpot timeline, and either app can trigger the other into action. For example, a deal moving to “Closed won” can send a text, or a customer’s reply can open a support ticket. No exports, no manual matching, no copy and paste.
What you can do
Keep contacts in sync
The background sync itself only runs one way, from HubSpot into Textmagic, so HubSpot stays the source of truth for contact details. That’s just the automatic sync though. Further down, you’ll see that automations are a separate mechanism and can deliberately write specific changes into HubSpot when you want that.
- Pull your existing HubSpot contacts into a Textmagic list in one go.
- New contacts created in HubSpot are added to Textmagic automatically from then on.
- Updates made to a contact in HubSpot flow through to Textmagic automatically. A change made the other way round, in Textmagic, stays in Textmagic unless you push it to HubSpot on purpose with an automation action.
- Decide exactly which HubSpot properties map to which Textmagic fields, and leave the rest unmapped if you don’t need them.
See every text on the contact timeline
- Outbound messages you send from Textmagic are logged as SMS activity on the HubSpot contact record.
- Inbound replies from customers are logged the same way, so the full back and forth is visible without leaving HubSpot.
- When someone opts out of SMS, that status is synced to HubSpot automatically, so nobody on your team accidentally texts them again.
Automate in both directions
Inside Textmagic’s automation builder, HubSpot shows up both as a source of triggers and as a set of actions. This is separate from the background contact sync above: an automation is a deliberate step you build, so its actions can write into HubSpot (update a property, add a note, move a deal, and so on) any time that’s what the automation is meant to do. Here’s the full list of each, plus how the same idea works the other way round, from inside HubSpot itself.
Triggers: what can start an automation in Textmagic
| Trigger | Fires when |
|---|---|
| New contact | A contact is created in HubSpot |
| Contact property updated | A mapped contact field changes |
| New deal | A deal is created in a pipeline |
| Deal property updated | A deal’s stage or another property changes |
| New ticket | A support ticket is created |
| Ticket property updated | A ticket’s status or another property changes |
| New conversation | A conversation thread starts in an inbox |
| Conversation property updated | A property on a conversation changes |
| New message in a conversation | A message arrives in an existing conversation |
Actions: what Textmagic automation can do in HubSpot
| Action | What it does |
|---|---|
| Update contact | Writes a value to a mapped HubSpot property |
| Add note to contact | Logs a note on the contact’s timeline in HubSpot |
| Add to list / Remove from list | Manages HubSpot list membership |
| Create new ticket | Opens a ticket in a chosen pipeline |
| Create new task | Adds a task, for example a reminder for a rep to follow up |
| Create new deal | Starts a new deal in a pipeline |
| Add note to deal | Logs a note on an existing deal |
| Move deal to stage | Advances a deal to a different stage |
Using HubSpot Workflows to send SMS
You can also send SMS messages via Textmagic directly from a HubSpot workflow. In HubSpot’s Workflows tool, select Choose an action, then scroll to Integrated apps. Select Send SMS by Textmagic to add an SMS message as a step in your workflow.
You do not need to create a separate automation in Textmagic. To view or update the connection, select Open app settings in the same panel.
Connecting Textmagic to HubSpot
Setup is a short wizard with four steps, and you can leave partway through and pick up where you left off.
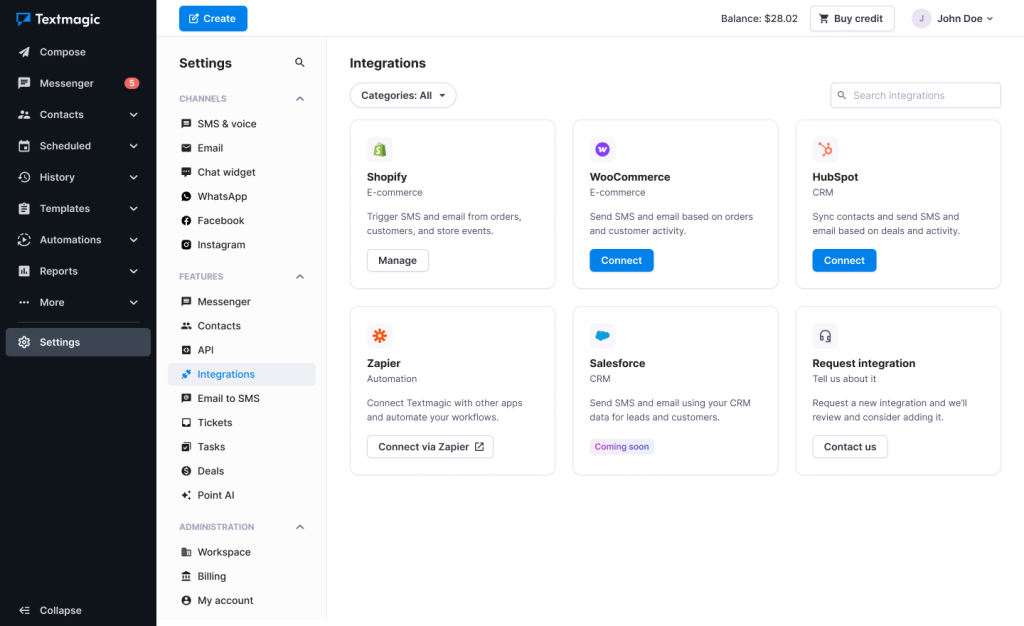
- In Textmagic, go to Settings → Integrations, find the HubSpot card and click Connect.
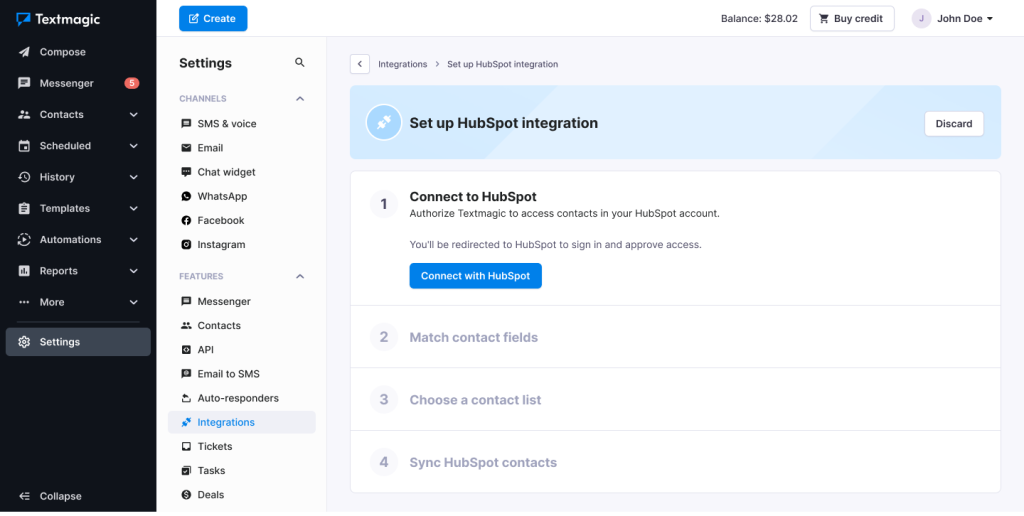
- Click Connect with HubSpot. You’ll be redirected to HubSpot to sign in and approve access. There’s nothing to configure manually here, the connection completes automatically once you approve.
- Match your contact fields (more on this below), then click Continue.
- Choose the Textmagic contact list that HubSpot contacts should land in, then click Start sync.
That’s it. Textmagic starts pulling your HubSpot contacts in and keeps them updated from that point on.
Matching your contact fields
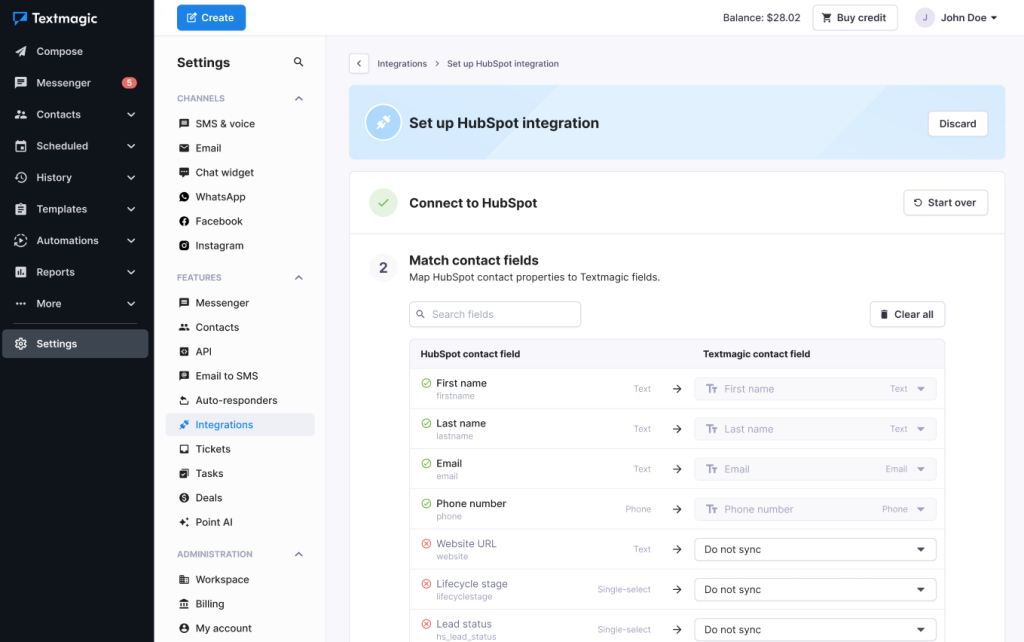
Before the first sync, you’ll see a mapping table with every standard and custom HubSpot contact property down the left and a matching Textmagic field on the right. A handful map automatically because the fields line up on both sides:
| HubSpot field | Type | Maps to |
|---|---|---|
| First name | Text | First name |
| Last name | Text | Last name |
| Text | ||
| Phone number | Phone | Phone number |
Everything else, things like lifecycle stage, lead status, preferred channels, number of employees or date of birth, comes through as Do not sync by default. Leave it that way if you don’t need it in Textmagic, or point it at a custom field if you’d rather have it available for personalizing messages and building segments. You can search the field list if your HubSpot account has a long list of custom properties, and Clear all resets the table if you want to start over.
Choosing where synced contacts land
Next, pick (or create) the Textmagic contact list that HubSpot contacts should be added to, for example a list called “HubSpot contacts.” This keeps your synced contacts separate and easy to filter, rather than mixed in with everyone else in your account.
Before you hit start, Textmagic tells you exactly what’s about to happen:
When you start the sync: matching HubSpot contacts are added to the list you chose, and any of those contacts that already exist in Textmagic are updated with the mapped fields.
After the sync: new HubSpot contacts are added automatically. Contact updates in HubSpot will keep syncing to Textmagic. Contact updates made in Textmagic will not sync back to HubSpot. New SMS activity is logged to the HubSpot contact timeline.
Keeping the sync running
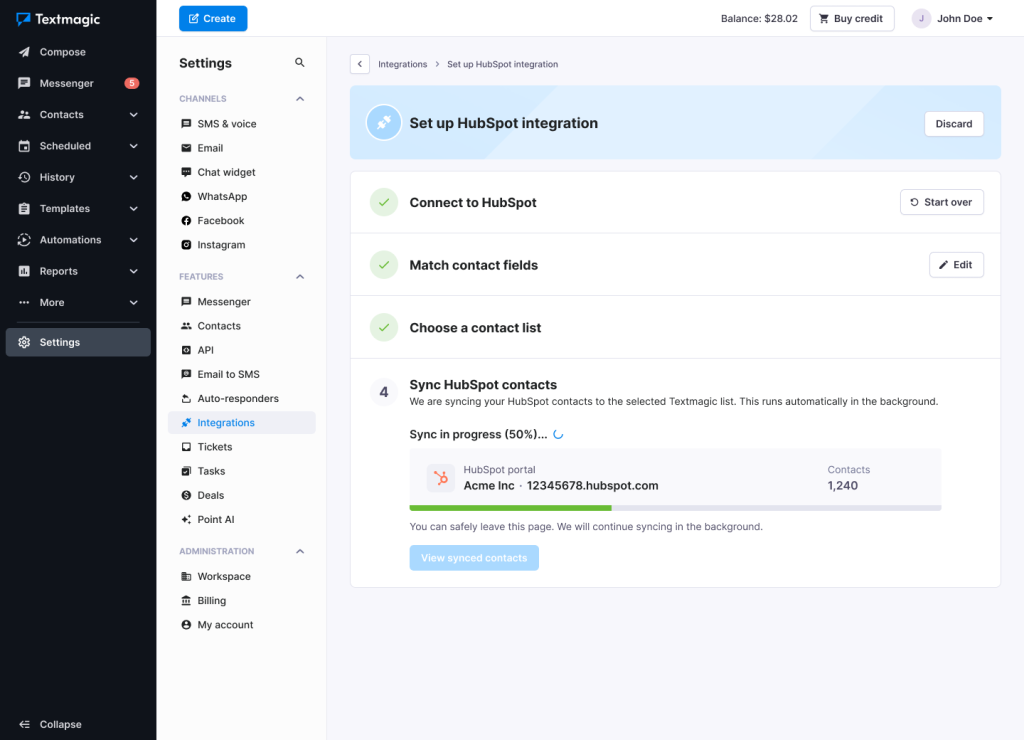
The first sync runs in the background, so you can close the tab and get on with your day. Textmagic shows you the progress as a percentage along with how many contacts are being pulled in.
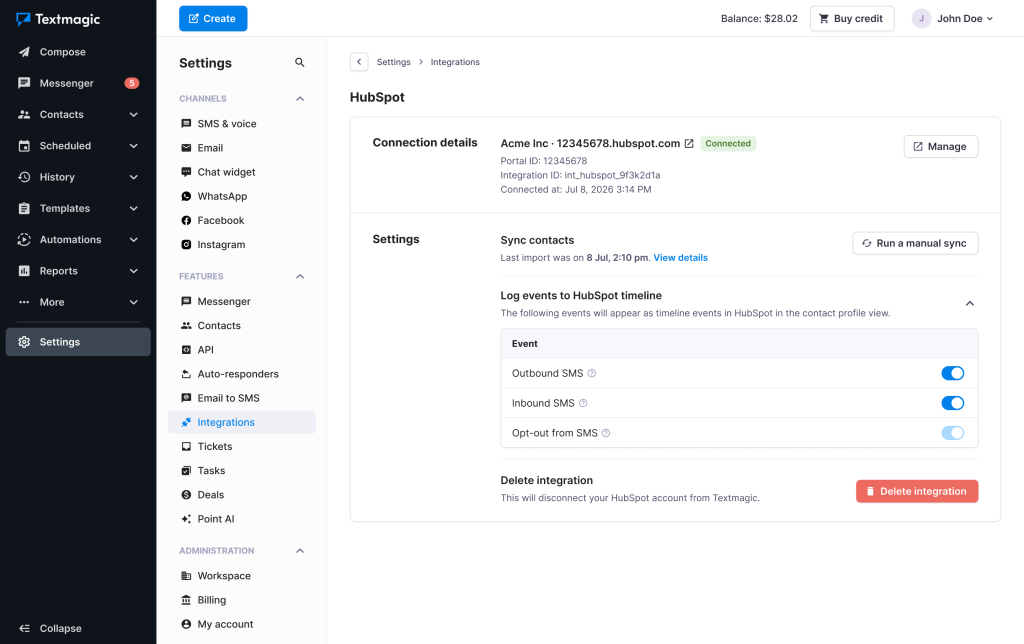
Once connected, the integration card in Settings → Integrations → HubSpot becomes your control panel. You’ll see your portal name, portal ID, integration ID and the date you connected, plus:
- Run a manual sync, if you want to pull in changes right now instead of waiting.
- The date of the last import, with a link to view details.
- The timeline logging settings, covered next.
What events show up on the HubSpot timeline
Under Log events to HubSpot timeline, you’ll find three toggles that control what gets recorded on a contact’s timeline in HubSpot:
| Event | What it logs | Can you turn it off? |
|---|---|---|
| Outbound SMS | Messages you send are logged as SMS activity on the contact’s timeline. | Yes |
| Inbound SMS | Messages received from contacts are logged as SMS activity on the contact’s timeline. | Yes |
| Opt-out from SMS | When a contact opts out of receiving SMS, their opt-out status is synced to HubSpot automatically. | No, this one always stays on |
Why opt-out logging can’t be switched off: it’s the one signal that protects your whole team from accidentally texting someone who’s asked not to be contacted. Keeping it on by default means an opt-out in Textmagic is respected everywhere, not just in the app it happened in.
Best practices
A few ways teams use this
Welcome new leads right away. Trigger: New contact, lifecycle stage is Lead. Action: send a welcome SMS and add the contact to a “New leads” list.
Faster follow up on new deals. Trigger: New deal, pipeline is Sales pipeline, stage is Appointment scheduled. Action: send an SMS to the deal owner and add a note to the deal confirming it went out.
Turn a reply into a ticket. Trigger: New message in a conversation, inbox is Support inbox, direction is inbound. Action: create a new ticket in the Support pipeline with the message as the description, so nothing sent by text falls through the cracks.
Nudge a high-priority ticket. Trigger: Ticket property updated, priority is High. Action: send an SMS to the ticket owner and create a task to check in.
Celebrate (and log) a win. Trigger: Deal property updated, deal stage is any of Closed won. Action: send a thank-you SMS to the contact, then move the deal to the next stage in your renewal pipeline.
Keep these in mind
- Map only what you’ll use. It’s tempting to sync every custom property, but a shorter, cleaner set of fields is easier to build personalized messages and segments around.
- Remember the sync direction. The background contact sync only runs from HubSpot to Textmagic, so HubSpot is the source of truth for contact details. If a rep updates a phone number in Textmagic, make the same change in HubSpot, or it won’t carry over. If you need a specific update pushed into HubSpot, do it deliberately with an automation action instead of relying on the sync.
- Filter your triggers. An automation on “any new deal” fires constantly. Narrowing it to a pipeline, a stage or a priority keeps your texts relevant instead of noisy.
- Decide on inbound and outbound logging early. If your team relies on the HubSpot timeline as the record of every customer interaction, leave both toggles on. If SMS volume is very high and the timeline gets noisy, that’s a conversation to have with the team before switching one off.
- Set a fallback for missing records. When an action can’t find a matching deal or ticket, choose whether the automation should skip the step or stop and flag an error, based on how critical that step is.
- Check your synced list occasionally. A quick look at the contact list HubSpot syncs into helps you catch anything unexpected, like fields that mapped differently than you intended.
Managing or disconnecting the integration
Everything lives in Settings → Integrations → HubSpot. From there you can run a manual sync anytime, review when the last import happened, adjust timeline logging, or remove the connection entirely with Delete integration. Disconnecting stops the sync and unhooks your HubSpot account from Textmagic. Contacts and messages already synced stay where they are, they just stop updating.
Common questions
Does this cost anything extra?
Connecting HubSpot doesn’t carry a separate fee. Sending SMS through Textmagic still uses your account balance, the same as any other message. You can check current rates and plans on the Textmagic pricing page.
Will editing a contact in Textmagic change it in HubSpot?
Not through the background sync. That runs one way, from HubSpot to Textmagic, so treat HubSpot as the master record for contact details. If you specifically want a change to reach HubSpot, use an automation with the Update contact action to write it there on purpose.
Can I connect more than one HubSpot account?
The integration connects to one HubSpot account per Textmagic account. If you manage multiple HubSpot accounts, you’ll need a Textmagic account for each one.
What happens to messages already logged if I disconnect?
They stay on the contact timeline in HubSpot. Disconnecting only stops new activity from being logged going forward.
Ready to see it for yourself? Head to Settings → Integrations in your Textmagic account and connect HubSpot in a couple of minutes.