Chat widget for all communication
Creating a new chat widget
Textmagic chat widget brings together live chat, email, SMS, calls, and WhatsApp in one place.
With the Textmagic Messenger, you can easily manage calls and two-way conversations started through SMS, WhatsApp, and live chat channels from a single screen. It’s a simple and convenient way to handle all your communications without switching between platforms.
To create a chat widget, navigate to Messenger -> Messenger settings -> Click on Chat widget. Next, click on “New widget,” provide a name, and click “Create.”
Note: Textmagic creates a ready-to-use widget with the best text options and features already enabled, so you can start using it right away without needing to make many adjustments.
Chat widget editor
The chat widget editor with a preview is a tool for building and customizing your form to fit your needs. Below you can find instructions and helpful tips to guide you through the process.
To access the widget editor, go to the Chat widget -> Select the widget you want to modify.
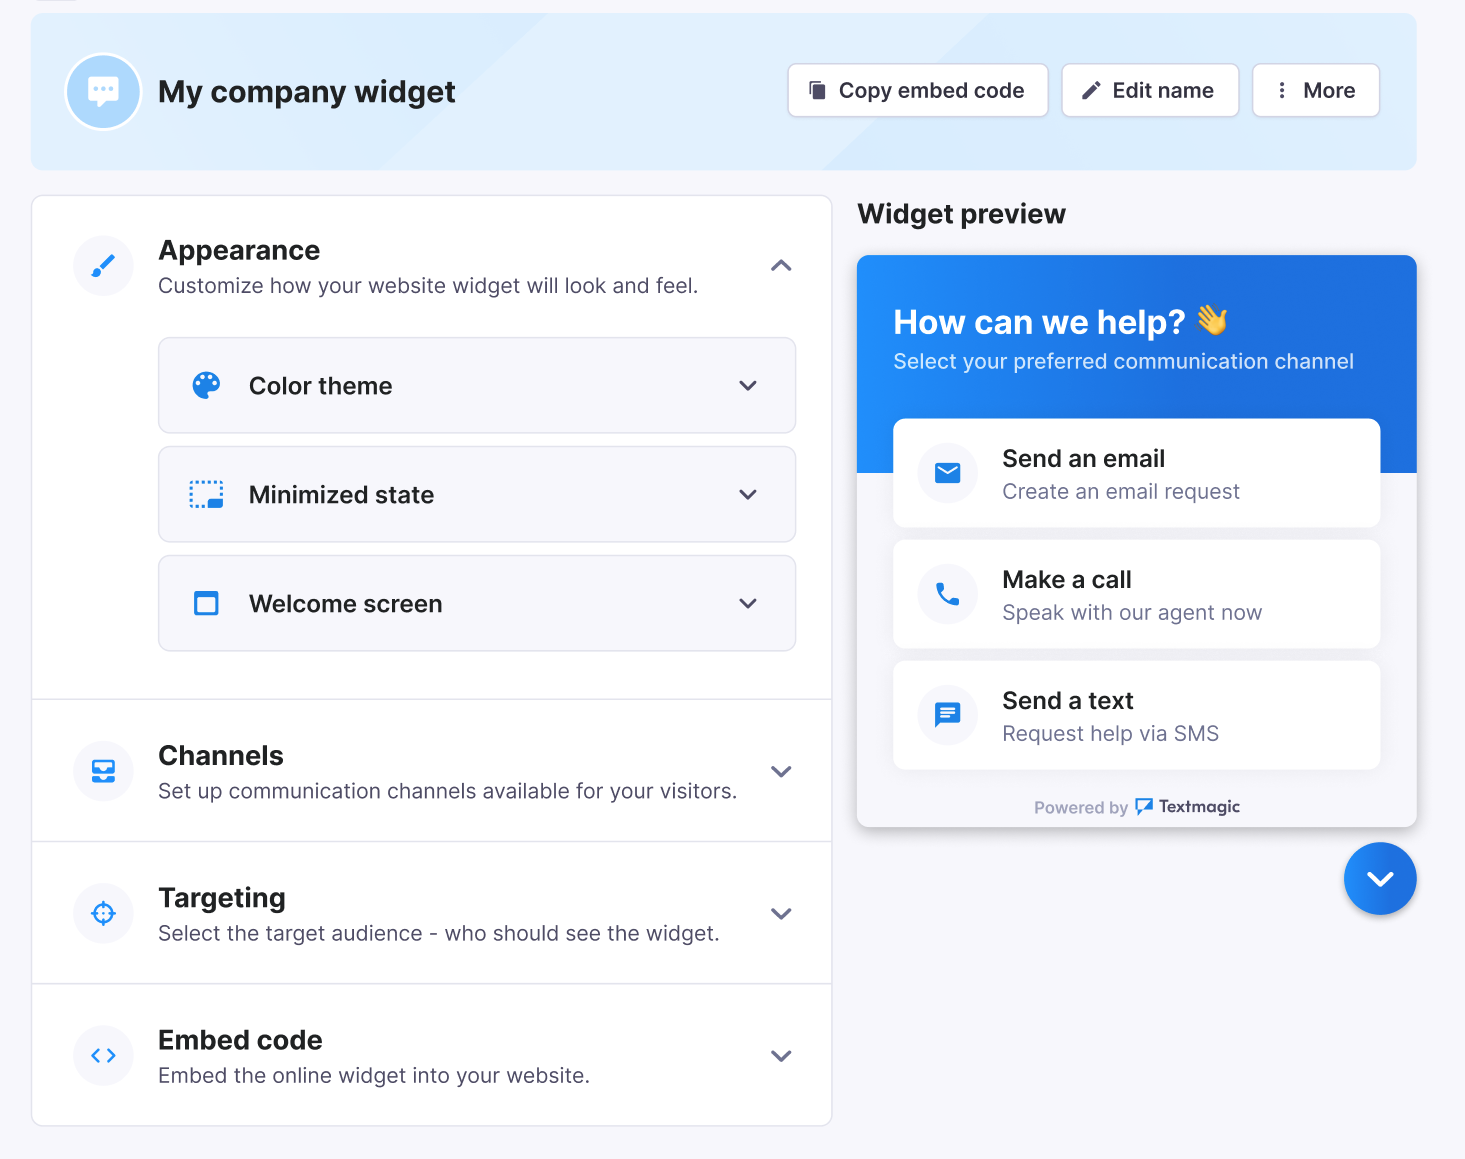
Appearance
Appearance section lets you customize the appearance of your widget in 3 different ways:
- Color theme: Pick colors for your widget’s background and submit button.TIP: Consider using your brand’s primary color for consistency across your digital platforms.
- Minimized state: Choose what your website visitor will see as an icon and button text when the widget is not fully open.TIP: We recommend using an eye-catcher message to show your website visitors your immediate availability and willingness to assist.
- Welcome screen: Add a greeting and a message that your visitor will see when opening a widget from the minimized state.TIP: A friendly and clear welcome message can set the tone for positive customer interactions.
Channels
Textmagic omnichannel chat widget currently supports live chat, email, SMS, calls and WhatsApp as channels.
The Channels section allows you to set up and manage the communication methods available to your website visitors. By default, all channels are enabled. Use the turn on/off button to enable/disable the channel.
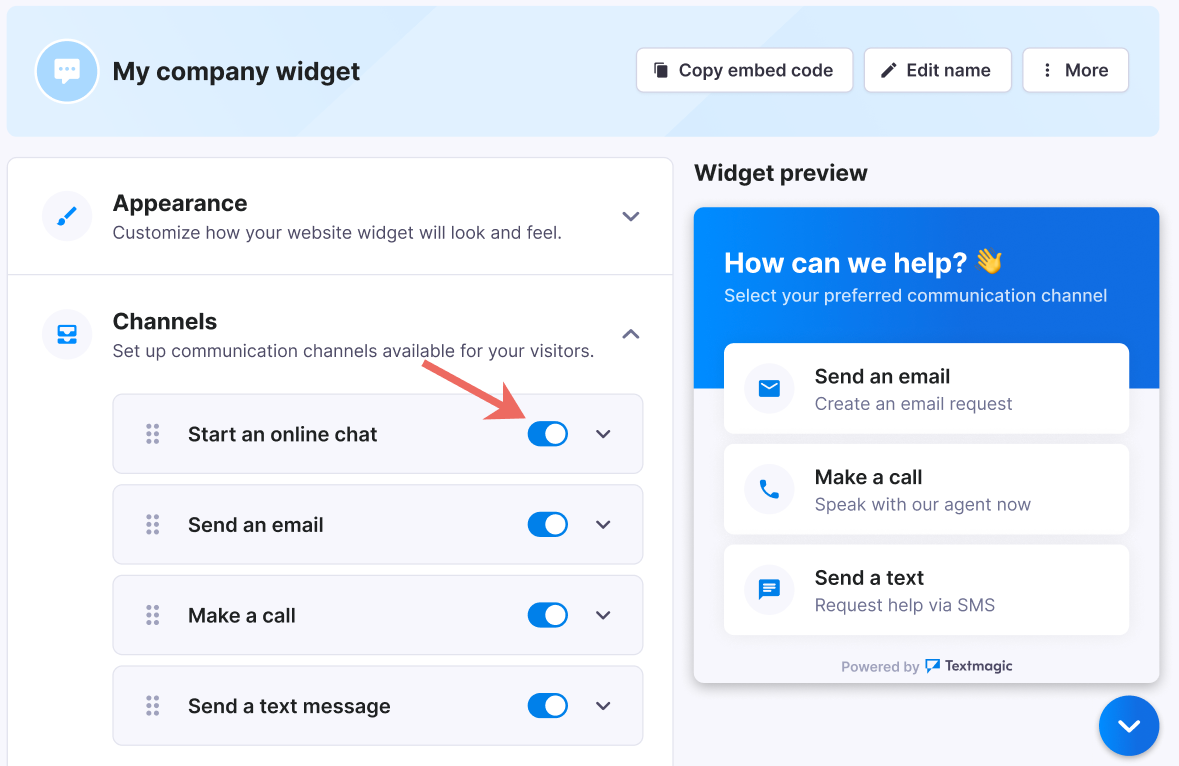
Here’s a step-by-step guide on how to configure each channel:
Start a live chat channel enables visitors to instantly connect with you for real-time assistance directly on your website. A live chat message will be sent to your Textmagic Messenger.
- Welcome screen: Personalize the initial message that visitors see when they open the live chat.
- Pre-chat form: Set up a form to collect basic information from visitors before they start a live chat. This can include fields like name, email, or reason for contacting support, allowing your team to have essential details before engaging in conversation.
- Queue settings: Choose an auto-reply message, manage wait times, and automate responses when support agents are busy.
- Satisfaction survey: After the chat, you can enable a survey to collect feedback from visitors on their chat experience.
- Additional settings : Select the list where all leads that send a message to you will be added.
Send an email channel allows visitors to send email requests directly from your website to your preferred email address.
- Welcome screen: Personalize the initial message your website visitors will see when they see the widget.
- Form fields: Choose the required form fields your website visitors will see and need to fill in when they contact you via email.
- Success screen: Design a thank-you message that appears after the visitor successfully sends their email via the widget to you.
- Associated email: Specify the email address to which all incoming messages from the widget will be sent. By default, your account’s registered email address is selected.
Send a text message channel allows visitors to request help via SMS directly from your website. A text message will be sent to your Textmagic Messenger.
- Welcome screen: Personalize the initial message your website visitors will see when they see the widget.
- Form fields: Choose the required form fields your website visitors will see and need to fill in when they contact you via text message.
- Success screen: Design a thank-you message that appears after the visitor successfully sends their message via the widget to you.
- Numbers and countries: To ensure that you can have 2-way conversations with your customers, please buy and use a local virtual number in the destination country. If your account does not have a virtual number in the country detected by the IP, select the global number that will be shown.
- Additional settings: Select the list where all numbers that send a message to you will be added.
TIP: We recommend using the “Add subscribers to list” option because it allows you to easily capture and manage leads from form submissions.
Make a call channel allows visitors to easily call you by dialing your Textmagic number visible in the widget. Depending on what you select in the number settings, the call will be forwarded to Messenger or your own number.
- Welcome screen: Personalize the initial message your website visitors will see when they see the widget.
- Call us screen: Choose the title, description, and button that visitors will see if they select the “Make a call” option.
- Numbers and countries: Select the Textmagic virtual number or your own custom number that your visitors will dial if they wish to contact you. Choose the default number that visitors will see if no virtual number is available in their country.
Chat on WhatsApp channel allows visitors to initiate conversations with your business directly through WhatsApp. Messages sent via this channel will appear in your Textmagic Messenger, making it easy to manage all communications in one place.
- Welcome screen: Customize the initial message that visitors see when they open the WhatsApp chat option in your widget.
- Message us on WhatsApp: Choose the title, description, and button that visitors will see if they select the “Chat on WhatsApp” option.
- WhatsApp number: Select the WhatsApp number that you earlier connected to Textmagic or choose to display a custom number that will be linked to the QR code.
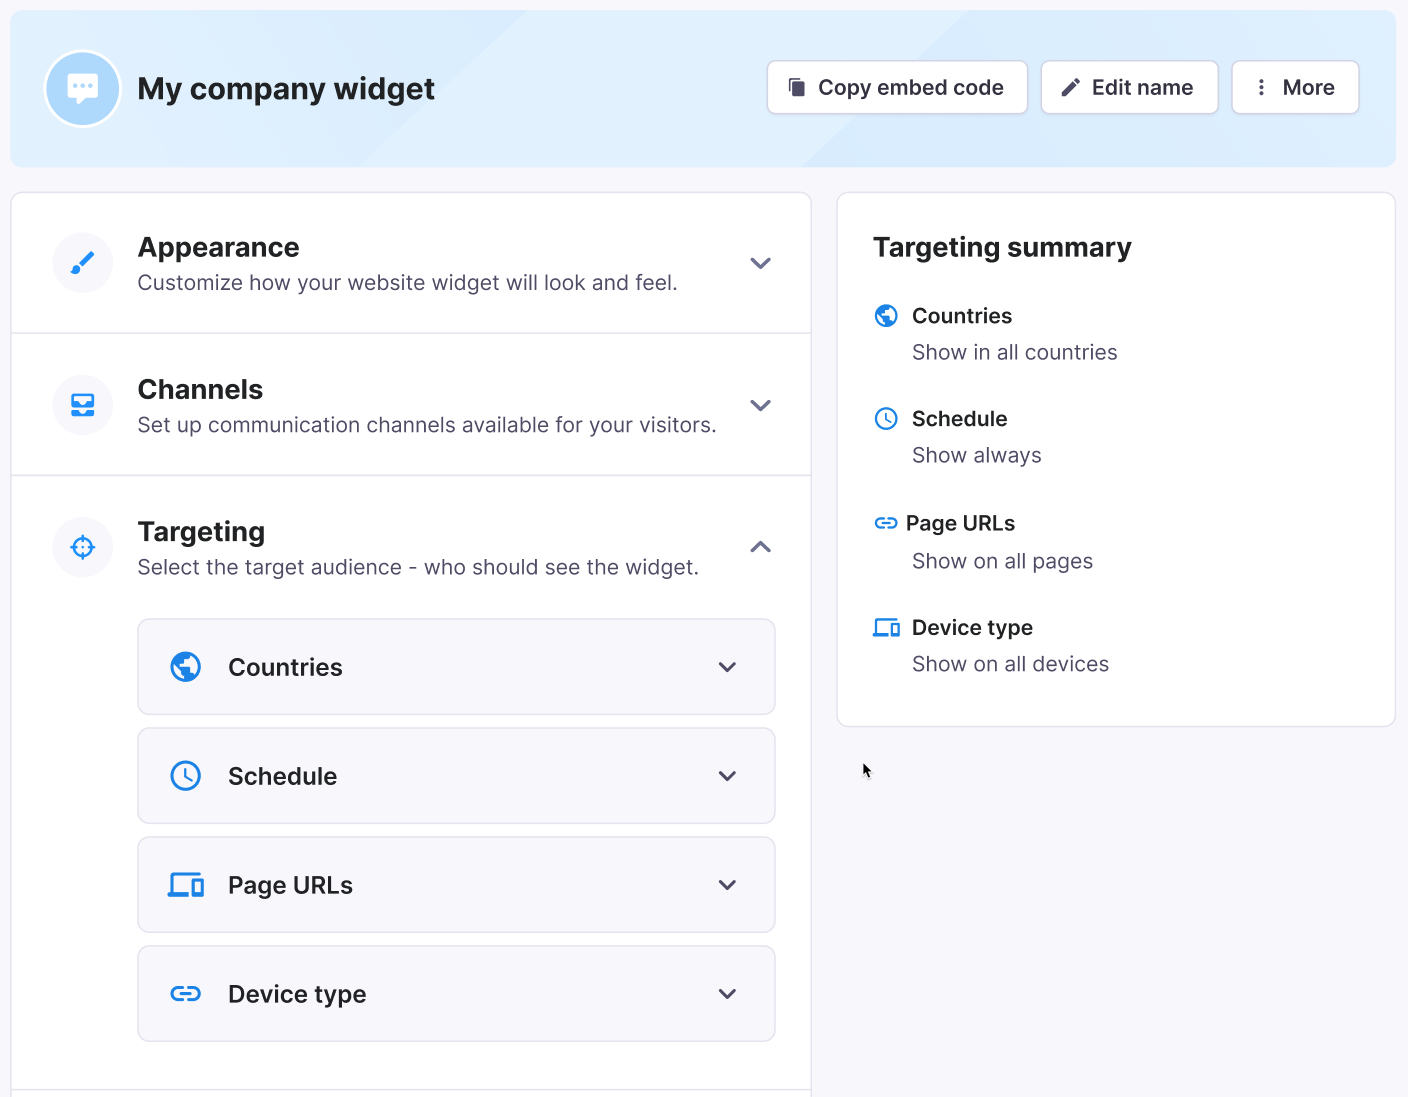
Targeting
Targeting in your Textmagic chat widget allows you to control who sees your widget and when it appears. This ensures that your widget is shown to the right audience at the right time, optimizing its effectiveness. Below you can find the targeting parameters that you can configure.
- Countries: Select to display the widget in all countries, hide it in some countries, or display it only in selected countries.TIP: If your services are location-specific, targeting certain countries can help you focus on the most relevant audience.
- Schedule: Control when your widget is visible to visitors. You can set the widget to appear at specific times of day or days of the week.TIP: Use scheduling to match your team’s availability, ensuring that incoming inquiries can be promptly addressed.
- Page URLs: Specify which pages of your website should display the widget. You can choose to show the widget on all pages, or only on specific URLs.
- Device type: Decide if the widget should appear on desktop, mobile, or both.
After configuring your preferences in the widget, make sure to save changes.
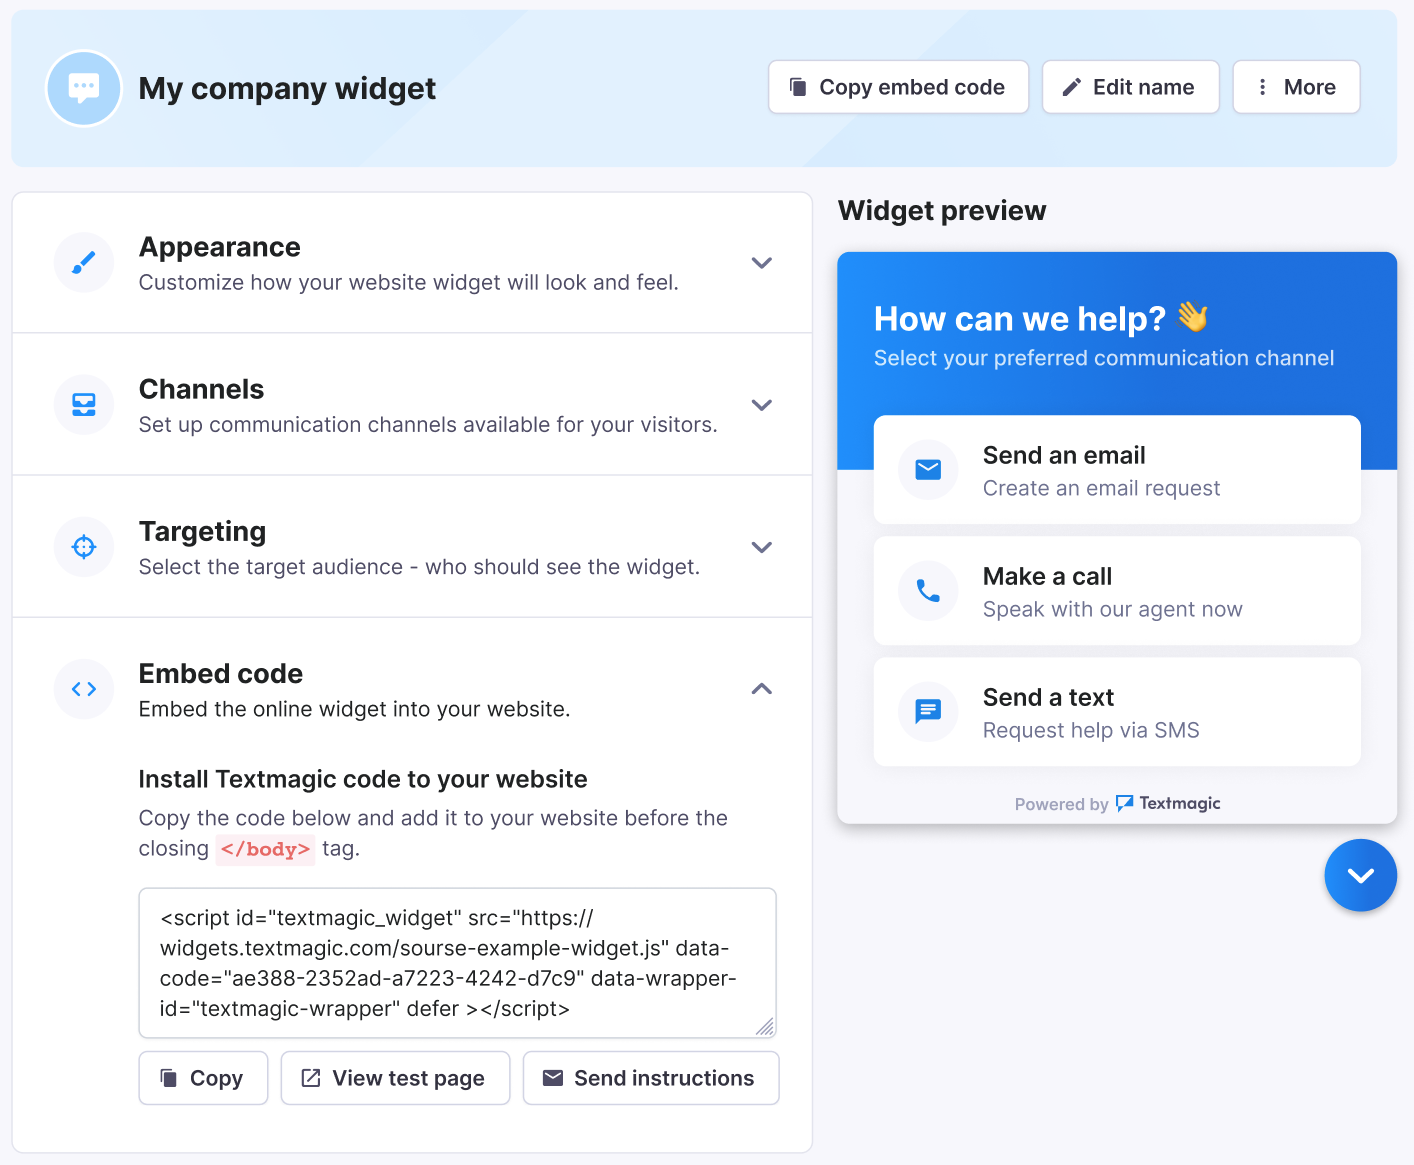
Embed code
After customizing the appearance, channels, and targeting for your Textmagic chat widget, the final step is to embed it into your website.
You can Copy code, View test page or Send instructions to your developer.
TIP: “View test page” is a great way to make sure everything looks and works as expected before going live.
FAQ
Why use the Textmagic chat widget?
The Textmagic chat widget is a powerful tool that can improve your website functionality in several key ways:
- Expand communication channels: The chat widget lets customers connect with you through various channels, including WhatsApp, live chat, SMS, email, and calls—whatever works best for them.
- Improve real-time interaction: With the chat widget, customers can easily contact you directly from your website using any device. This allows you to respond quickly to their needs, making them feel heard and valued.
- Simplify lead capturing: The chat widget collects valuable information from potential leads, helping you to efficiently manage and grow your business.
Without the chat widget, your website would lack essential features and become a one-sided, passive experience where users can only consume content without any means of interaction with your business.
Can I choose which communication channels are available on my widget?
Yes, you can. In the Channels section in the widget editor, select which channels (live chat, WhatsApp, email, text message, call) you want to make available to your visitors. You can also customize each channel’s settings to suit your needs.
How do I target specific audiences with my widget?
In the Targeting section, you can define who sees your widget based on criteria like countries, schedule, page URLs, and device types. This ensures that your widget is seen by the most relevant people.
Can I edit the widget after it has been embedded?
Yes, you can return to the widget editor at any time to make changes. After editing, simply save your changes, and they will be applied automatically without needing to re-embed the code
Can I test how the widget looks before going live?
Yes, after setting up your widget, you can click on the View Test Page button in the Embed Code section. This lets you preview how the widget will appear on your website and make any necessary adjustments before it goes live.
How do I embed the chat widget into my website?
To embed the widget, go to the Embed Code section, copy the provided code, and paste it into your website’s HTML before the closing </body> tag. This will activate the widget on your site, making it visible to visitors.
What should I do if I want someone else to embed the widget for me?
If you need help embedding the widget, you can use the Send Instructions button in the Embed Code section to email the code and instructions directly to your web developer or IT team.